Security User
The feature allows the administrator/user to search for existing security users in order to make modifications and set up new users. All iVend users have to be set up as a security user to provide him/her the rights to access various features in Management Console and/or POS.
To make modifications or create a new user, the administrator/user logs into the Management Console using the administrator/users own code and password as was setup in this screen. (There is a default user set up in the installation that can be used to begin setting up users.)
To open the window, choose Administration >> Authorization >> Security User.
Search Screen
Field
|
Description/Activity
|
Search Criteria
|
Code
|
Enter the code of the security user to be searched.
|
Electronic Id
|
Enter the electronic id of the security user(s) to be searched.
|
Search Results
|
Code
|
Displays the code of the security user(s) searched
|
Electronic Id
|
Displays the electronic code of the security user(s) searched.
|
Security Role
|
Displays the code of the security role assigned to the user
|
Must Use Magnetic Card
|
Indicator of whether the user would use the magnetic card or not.
|
Setup Screen
Field
|
Description/Activity
|
Login Id
|
Enter the login id of the security user. A unique code of a maximum 20 alphanumeric characters can be entered.
|
Password
|
Enter the password. A password of a maximum 20 alphanumeric characters can be entered.
|
Electronic Id
|
Enter the electronic code of the security user. A unique code of a maximum 40 alphanumeric characters can be entered.
 This code is used if the user uses magnetic card to log into the system instead of manually entering a user id and password. This code is used if the user uses magnetic card to log into the system instead of manually entering a user id and password.
|
Security Role
|
Select a role from the list of security roles. Click
[...] to open the Security Role Search screen and select the role. To add a new role, press F3 or click [F3 New] in the Security Role Search screen.
|
User
|
Select a user from the list of users. Click [...] to open the Employee Search screen and select the employee. To add a new employee, press F3 or click [F3 New] in the Employee Search screen.
|
Must Use Magnetic Card
|
Select the option to enable the security user to use the magnetic card instead of entering a user id and password while logging into the Management Console or the POS.
|
Active
|
Select this option to enable the security user to be active. By default this option is enabled. Only active users can log into the Management Console and/or POS
|
Can Change Password
|
Select this option to enable the security user to change his/her password while logging in Management Console or Point Of Sales.
|
Locked
|
This will be checked if the user is locked by the system.
Manager can login and mark the user as unlocked of else based on the security policy setup in the system, user will be un-locked automatically by the system after the specified time interval.
|
User Type
|
Select the type of the user from the valid values
•Production Users: Can only connect to production database from iVend application. All the transaction done by such user will be recorded in the production database.
•Training User: Can only connect to Training database from iVend application. All the transaction done by such user will be recorded in the Training database.
•Both: If the user is configured in this mode then while login the user will be prompted to choose between the production and the training mode. Based on the user selection the data would be saved in the corresponding database.
|
Existing Training Database
|
This dropdown would list all the training databases configured in the system.
|
Training Database Name
|
Select the database from the Existing Training database field or for creating a new training database enter the name in this field.
|
Is Enterprise User
|
Select this option is the user is an Enterprise user and is allowed to login in iVend Management console on the iVend Enterprise server.
|
Is Management Console User
|
Select this option if the user can login in iVend Management Console.
|
Allow Dashboard Web Viewer
|
Select this option in case the user is allowed to view iVend Dashboards though web viewer.
|
API Authentication User
|
Select this option if the user can authenticate REST APIs.
 An Authentication user cannot be Enterprise, Management Console, Web Viewer or Cloud user. Also, there can be only one API authentication user within the application. An Authentication user cannot be Enterprise, Management Console, Web Viewer or Cloud user. Also, there can be only one API authentication user within the application.
|
Is Cloud User
|
Select this option in case iVend is hosted on cloud and the user being created is a user of iVend could.
|
Cloud User Name
|
System will automatically assign the Cloud User Name in case the user is cloud user and the cloud is hosted with iVend.
|
Cloud User First Name
|
Enter the users First Name
|
Cloud User Last Name
|
Enter the users Last Name
|
[Enroll Finger Print]
|
This button would be visible if the system is attached to a finger print reader (Biometric reader).
Click on this button to capture the users finger prints.
|
[Update Training Database]
|
Click this button, if you want to refresh the training database.
 On upgrading iVend, the training database does not automatically upgrade and therefore the manager must login in iVend management console and update training databases after an upgrade. On upgrading iVend, the training database does not automatically upgrade and therefore the manager must login in iVend management console and update training databases after an upgrade.
|
[Mapped Stores]
|
Select the store in which this user can login in iVend Management console and do the transactions.
|
[OK]
|
The button updates changes to the database and closes the screen.
|
[Cancel]
|
The button does not save any changes and closes the screen.
|
 Security role of the super user cannot be updated. Security role of the super user cannot be updated.
Enroll Fingerprint
The feature allows the administrator/user to enroll/delete Fingerprints from the system.
To open the window, choose Administration >> Authorization >> Security User >> [Enroll Finger Print].
Enroll Fingerprint:
Use following steps to enroll your fingerprint:
1.Make sure that your fingers are clean and dry.
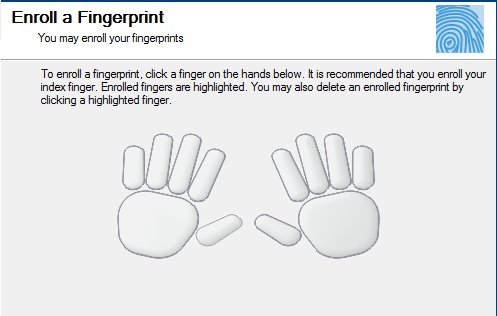
2.The "Finger Scanner" screen will appear as shown in Figure 1.
Figure
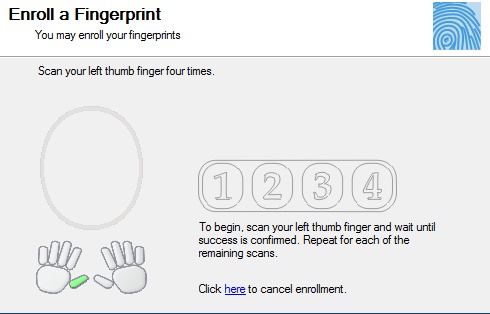
3.Select a finger on the screen, Figure 2 will appear.
Figure
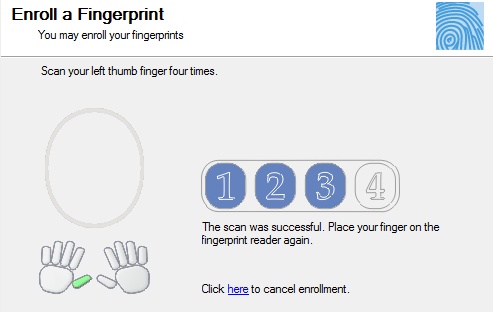
4.Press your finger against the sensor to enroll your fingerprint until the fingertip is recognized and accepted. You will need to swipe your fingertip 4 times to register the fingerprint with the system. After each successful scan, screen will appear as shown in Figure 3.
Figure
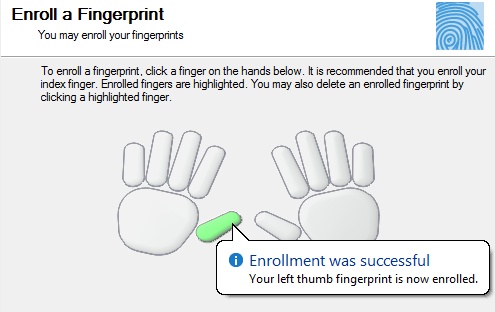
5.After successful enrollment, screen will appear as shown in Figure 4.
Figure
Delete Fingerprint:
Use following steps to enroll your fingerprint:
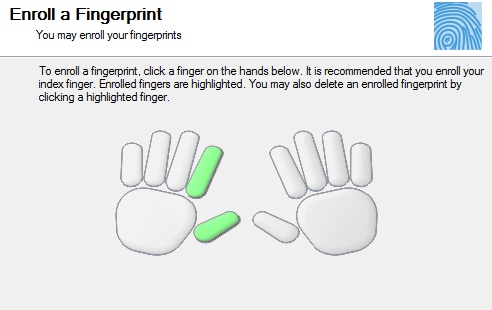
1.The "Finger Scanner" screen will appear as shown in Figure 5.
Figure
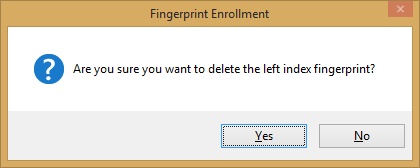
2.Click the finger for which fingerprint data needs to be deleted. A pop-up will appear as shown in Figure 6.
Figure
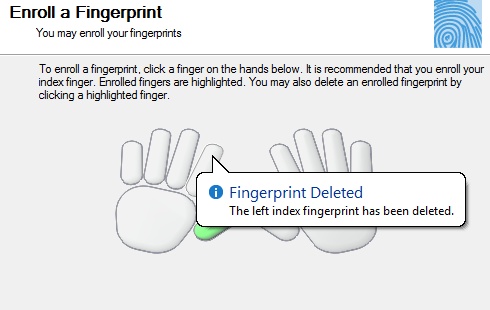
3.Click Yes. Confirmation message will appear for fingerprint deletion as shown in Figure 7.
Figure
|


